The ultimate guide to e-commerce product photography in 2025
Master e-commerce product photography in 2025 with expert tips on lighting, camera settings, AI-powered studios, and post-production. Boost sales with images that build trust and convert.
Table of contents
In 2025, e-commerce is more about visuals than ever. Online shoppers make quick decisions based on first impressions, so professional product photography is no longer optional for digital success. Whether you’re selling fashion accessories, cosmetics, or furniture, your product images are your storefront – and they need to be sharp, consistent, and optimised for every platform.
This guide covers the techniques in e-commerce product photography for 2025, from camera settings to lighting choice and AI-assisted photo studios. We’ll show you how to create images that build trust, increase conversions, and give your brand a competitive edge.
Let's start!
What is product photography?
Product photography is a crucial aspect of an ecommerce business, as high-quality images can increase sales and boost customer engagement. As a result, well-done visual content can actually affect the conversion rate, making it essential for online stores to invest in professional photography services.
The benefits of ecommerce product photography
Why is product photography important? Because it’s a crucial aspect of any e-commerce business, as high-quality images can significantly influence online sales and customer engagement. Shoppers can’t touch or try products online, so visuals become the primary way to communicate value, quality, and brand identity. Well-executed product images help bridge the sensory gap by offering clarity, context, and confidence, key ingredients in the decision-making process.
Moreover, compelling visual content doesn't just attract attention - it converts. Numerous studies show that professionally photographed products lead to higher conversion rates, reduced return rates, and stronger brand trust. From clean, white-background packshots to lifestyle photos and 360° interactive spins, great product photography allows businesses to stand out in crowded marketplaces and deliver the visual experience modern consumers expect.
Still life and packshot photography
Shopping online, you encounter hundreds of product photos covering a range of items from jewelry to electronic devices and groceries. Product photography splits into two types: still life and packshot. So let's look at the differences between packshot and still life photography.
Still life photography
Still life photography requires the photographer to present everyday products in an unusual and creative way. Most ordinary items do not look appealing in a simple shot. So it's about the photographer's creativity; the idea for a particular product, one that will make this ordinary item a shining focus of interest.
The main goal in this creativity is to expose the most important features of the item and create emotions around it. The photographed item must be presented adequately to reality, without venturing into fiction.
If you want to take photos in the still-life style, do not be afraid to experiment. Start your adventure with what's at hand. This is still life photography – it is meant to awaken your imagination.
This type of photography is mainly used in advertising.
Packshot photography
A packshot is a photo of an item showing it right in the centre of the frame. The object is placed on a consistent background, usually white. The aim is to present the item just as it is in reality, so that a buyer will not be disappointed when the package arrives.
The focus is on the product, so shoot it from multiple angles to give your audience all the details. This is where packshot photography differs significantly from still life - here you should hold back your creativity and not try to play with exposure.
Packshot photography is most often seen in the e-commerce industry, where detailed shots are a must.
What do I need for product photography?
To start your journey in product photography, you need to master some basic technical knowledge. You will also need equipment – a traditional or an automated photo studio.
Product photography equipment: lighting
Modern digital photography gives us full control of artificial light. Both at the moment of setting up the scene, when you can shoot many mock photos, and later, when you digitally process your files. Two types of lights are used in product photography: flash and continuous.
Flash lights (aka strobes) will light for a fraction of a second when the camera shutter is open, but you can see the result only after the image is taken. Strobes require synchronization with the camera shutter to operate properly (cable or remote). Constant lights shine continuously, and you can see the result even before you take the image. No synchronization with the camera is required.
When using studio flash lighting, you should keep in mind that thesynchronisation time usually comes at 1/200 s. It is worth remembering this parameter if you want to avoid a lighting mistake. If you shoot at a quicker shutter speed, the photo will probably be faulty, with an unwanted horizontal black line.
The flashlight will be more precise to catch movement in one still frame – flash duration can be as low as 1/1000 – 1/5000 (1-0.2ms), virtually freezing any movement in the image. You can use higher shutter speeds and operate freely in a no-tripod setting.
There is also a wide range of accessories available for flashlights, such as diffusers and reflectors, which will help a lot with the customization of your studio.
When using continuous lighting, you can benefit from the most important feature of modern digital cameras – you will enjoy the live preview. This option will let you observe how the light plays out on your product without the need to shoot a product.
Product photography equipment: camera
Almost everyone has a smartphone that takes good-quality pictures. But can we shoot a good photo for our online shop with it? Generally, yes. The photo will have good parameters, sufficient for online shops and social media needs.
For effective use of a mobile phone in product photography, there are light boxes and light tents. With the help of these portable studios, you will be able to provide a white background and studio lighting for your product. However, you'll have little room for manipulating the light and shadow or adjusting the view angle. Image consistency isn't easy to achieve, especially with a whole range of products. As a result, you probably won't be satisfied with its capabilities for real content production in a larger e-commerce enterprise.
So, how to streamline your content production without sacrificing quality? Look into product photography services? Buy a product photography studio? These are the questions I'm going to answer later. But for now, we should focus on photography gear.
If you decide to go professional and high-volume, you will have to choose a proper lens for your camera. Let's examine what would be needed.
A traditional photo studio setup with continuous lights
Which camera for product photography – DSLR or mirrorless?
For product photography, you can choose between DSLRs and mirrorless cameras with interchangeable lenses. But the truth is, you don't have to buy a fancy DSLR camera to take good product photos for your online store.
Mirrorless cameras are based on a modern design without such elements as a mirror in the viewfinder, a focusing screen, or a pentagonal prism. The focus preview is limited solely to the camera's display screen. Both DSLR and mirrorless cameras with interchangeable lenses have excellent resolution sensors.Modern mirrorless cameras can capture images using the electronic shutter (instead of the mechanical one), which limits vibration from the shutter and produces sharper images.
A full-frame sensor is 35,8 x 23,9mm, while an APS-C sensor is smaller, depending on the brand and model. Both allow the use of various lenses. Full control over exposition parameters such as aperture, shutter speed, and ISO remains an equally important factor here.
All in all, the highest level of control and best results can be achieved by using cameras with interchangeable lenses, whether a DSLR or a mirrorless camera.
Lens for product photography
The choice of optical solutions is very important. Thanks to the lens, the light falls on the sensor, and the picture is recorded. A lower quality optical solution will render less sharp photos. In general, there are two types of lenses: prime(fixed focal length – no zoom) and varifocal (zoom lenses).
A typical 50mm lens will do good in a lot of situations (and is quite cheap). 50mm is the optical setup that renders the image in a perspective close to the human eye. If you are using a crop sensor camera, I recommend using crop-dedicated lenses.
Also, the use of standard 50mm lenses will prevent variations in shape (distortion) of your products, but you will lose the flexibility when you shoot products varying in size. Here, the varifocal lens (zoom) will be more practical. Anyway,the rule of thumb is that product photography is shot at focal lengths of at least 50mm.
When shooting at a higher focal length, you don't have to put the camera very close to the object and thus limit the light. High focal length allows you to easily move away from the target while the camera system will apply the corrections to keep your product in its original shape and look. Very often, macro lenses are suggested for product photography due to their sharpness and magnification ratio (being able to shoot small items closely).
The last useful element that supports your camera is a good photo tripod. Firstly, it provides a stable surface for your camera to achieve sharp and unmoved photos. With the stable camera, you will be able to reduce the aperture and ISO for a higher depth of field and less noise.
Secondly, a tripod ensures repeatability of your shots. You set the studio only once, place your camera on the tripod, and then freely exchange photographed products with the guarantee that they will be shot at the same angle.
Product photography equipment: background
Your background choice changes from photo to photo, depending on the type of effect you want to achieve. If you are taking still life photos, there is plenty of freedom in the scene setting. The photographer arranges the setup, and the background changes from product to product.
Packshot photography is different, though. The item should be placed on a uniform background. Usually, we will go for asimple white background. This will also be the requirement of many e-commerce platforms such as Amazon.
But thepackshot photos can well have backgrounds of different colors, as long as they remain uniform and without additional elements. For example, some e-commerce businesses use a black background to achieve this modern mystery kind of vibe. Check out how to master black background photography from our blog post.
However, in traditional photography, it's not easy to achieve a pure white background without post-processing. This is where automation comes in!
Thanks to Orbitvu's hardware-based post-production, you get to benefit from multi-image capture and create true-to-reality images and videos with pixel-level precision and no added cloud costs.
Product photography techniques
Careful preparation of the product
Each product should be properly prepared for the photo session. The greatest enemy here would be the dust. You need to clean your object very carefully because everything will be visible in the photo. Here's what you need:
cotton gloves– never again leave fingerprints on the product,
cleaning product– it needs to match the product requirements,
microfibre towels,
a container of compressed air or a small compressor – to fight the dust,
a lint remover – useful for fashion photography.
Apart from cleaning, consider using props, complementary products, or lifestyle shots.
Shoot from multiple, standardized angles. Why does it matter? Customers expect a comprehensive view before buying. For consistency and faster production, standardize the number and type of shots per product.
Recommended angles:
Front (hero) shot – straight-on, centered, and well-lit. Often, the primary marketplace thumbnail.
45-degree angle – adds depth and realism. Ideal for showcasing 3D form.
Side profile – highlights shape and structure.
Back view– important for packaging, branding, or design details.
Overhead/flat lay– best for items like clothing, food, or kits with multiple parts.
Detail/macro shots– zoom in on textures, stitching, buttons, or unique features.
Pro tip:
Create an angle checklist and use laser guides or marked platforms to keep camera positions consistent across products.
Post-production process
With your shots ready on the drive, it's time for post-processing. For this, you need a proper editor program. It will help you to remove unwanted spots, adjust contrast, and change many other parameters. But above all, the main function of the program is to make the background perfectly white.
Working with programs such as Adobe Photoshop or Affinity Photo can be a daunting task, especially for beginners. You will have to learn the use of layers, masks, and cutting tools, which might take up to a few months to master.
The simplified photo editing provided in automated photo studio solutions, like Orbitvu, may turn out to be worth an investment. Thanks to hardware-based post-production, the user can quickly and easily achieve a background-free image. And that's how high-quality product photos are done.
Photography tips: how do I take professional product photos?
Following photography tips, such as using natural light, experimenting with angles, and optimizing images, can surely help improve product photography skills.
But practicing and experimenting with different techniques and setups is what can help you develop a unique style and approach as a professional photographer or content creator. Following the latest industry trends in ecommerce photography and best practices can help ensure high-quality images that drive sales and customer engagement.
Now, let's move on to a few product photography tips that you surely don't want to miss.
Camera settings
The way you set your camera will be key to the final quality of the photo. When you make a mistake at this stage, it can turn out that the photo will lack sharpness, have excessive noise, or have wrong (untrue) colors.
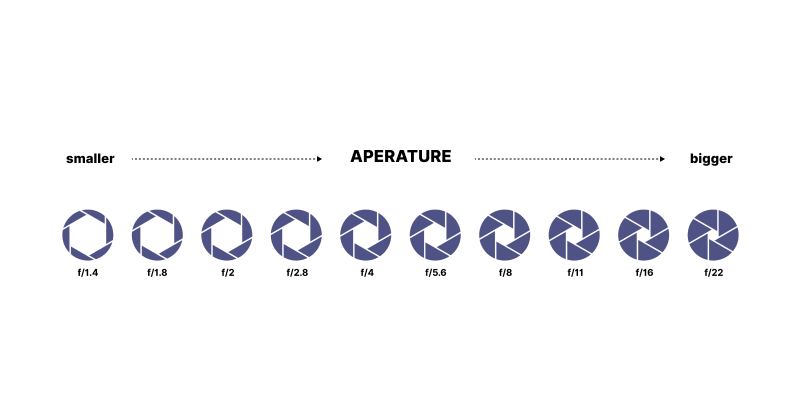
The aperture is a hole in the lens that determines how much light will fall onto the sensor. It's measured with the f-stop figure. The aperture influences the depth of the field, which is the distance in front of and behind the focus point. The best image quality is produced using mid-range f-stops, i.e., around f/11.
The next setting is shutter speed, also called exposure time. The shutter is a mechanism that covers and uncovers the sensor or film. With the adjustment of shutter speed, you can decide whether the photo will be lighter or darker.
ISO value is a parameter of the sensor indicating its sensitivity to light. If you set the ISO too high, it will create image noise. Modern sensors allow high-quality images at an ISO as high as 800.
White balance
White balance setting allows you to correct any differences in color coming from the light color temperature, and is digitally adjusted by the camera:
How to set the white balance using continuous lights | Orbitvu
Historically, the optimal light color temperature was 5500K (neutral white). It has less meaning today, as a camera can compensate for almost any light temperature. You should aim for a minimum value of 95 CRI (100 is maximum).
Proper composition
A packshot should give the most faithful representation of the product. The view should present the product at its best. The perspective should remain neutral, similar to one from a real-life shop.
Photo resolution
Always aim to capture at the highest resolution. Although the final image resolution in an ecommerce store isn't high, shooting at the highest quality allows you to crop details from the image or use the image for print.
Exposing the color and texture of an item
It will be your task as a product photographer to take the picture in a way that reflects the product's character. You will have to play with its color and the material it is made of. The color has to stay natural.
Proper rendering of the material of the product is also a key factor in a shop's success. So show the texture. Check out our complete guide to flat lay fashion photography for techniques of exposing material features.
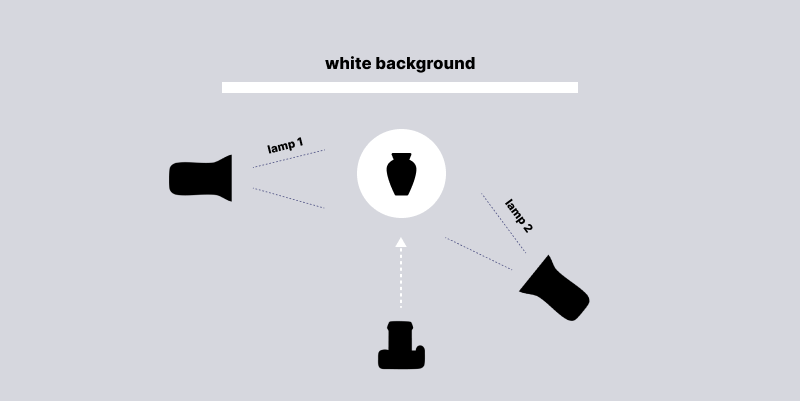
Lighting setup for better texture
In product photography, the properly set up lighting adds the third dimension to a flat image. This means that you need to set the lighting unevenly, so it lights strongly from one side. The product will show delicate shadows and lighter spaces.
But what to do if the image is meant to be repeatable? Draw a visual aid. Just like this one:
Here, you have the whole photo setup. Where the lights are, what intensity they shine with, what the distance is, etc. You can also describe the type of background and camera settings. You will need floor marks for your turntable and lights to be precise.
A drawing isn't always sufficient, especially when you have to move the studio quite frequently. As a result, your process would be costly. Also, this way, perfect repeatability of shots would be difficult to achieve.
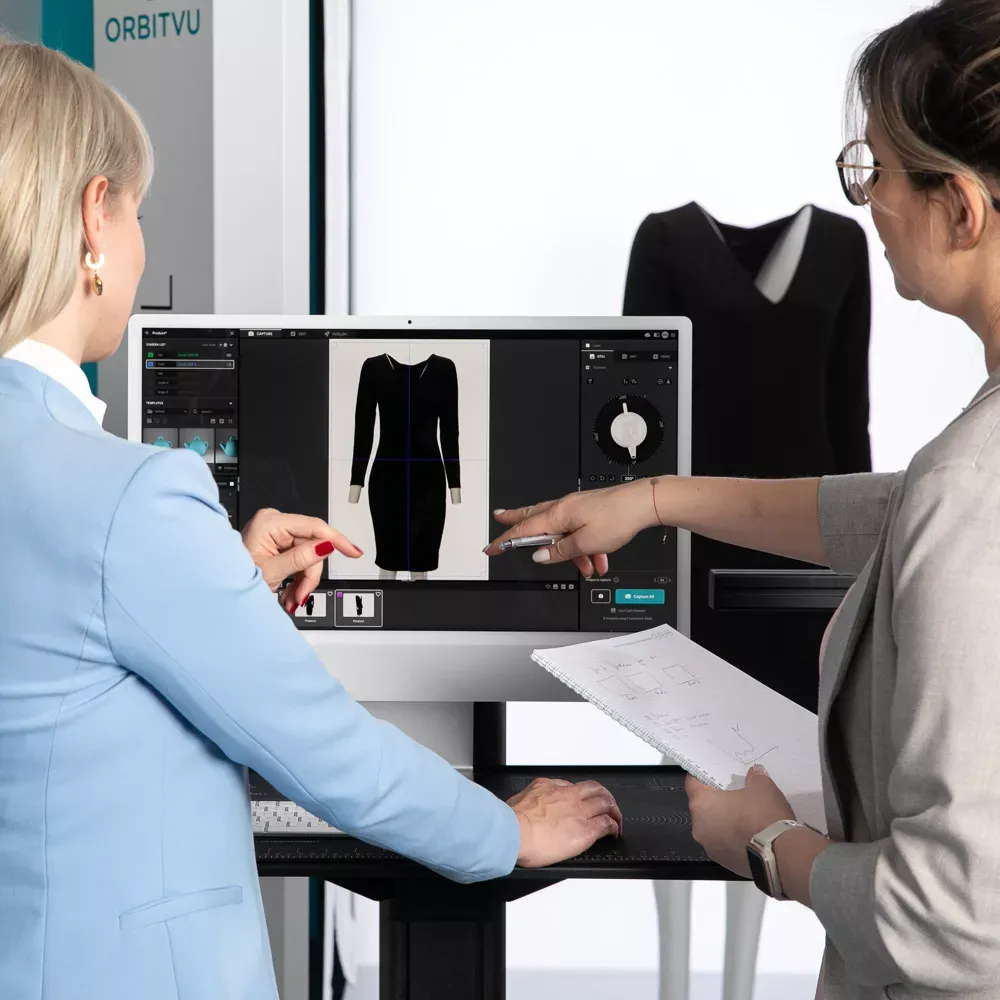
Automation of product photography
Automated photo studios make product photography faster and more professional than traditional setups. The key difference is the seamless integration of camera, lighting, turntable, and software to streamline workflows and results.
Introducing ALPHASHOT PRO G2: AI-powered photography
Orbitvu’s latest innovation, the ALPHASHOT PRO G2, is a big step forward in automated product photography. This compact AI-powered studio is for small to medium-sized products, all in one solution for stills, 360° spins, and videos.
Features:
AI Photo Assistant:The AI Photo Assistant uses machine learning to recognize the product and suggest the best lighting setup, so users of any level of photography experience can use it.
Advanced lighting system: 74 individually controlled LED panels, studio-grade lighting for high contrast images.
Fast workflow: Hardware and software integration for rapid production, high-quality videos in under 1 minute, and up to 250 products a day.
Hardware-based post-production:Orbitvu’s approach is to capture high-quality ecommerce product photography from the start, so less post-processing is needed. The system removes backgrounds and generates natural shadows during capture, saving time and resources.
The ALPHASHOT PRO G2 is perfect for industries that need detailed product imagery, like cosmetics and eyewear. The precision lighting and AI setup make products look great, so online presentation and customer engagement increase.
Looking for something different? Browse our industry page to find the solution that best fits your needs.
Conclusion on high-quality ecommerce photography
As you can see, mastering product photography requires a combination of technical skills, creativity, and attention to detail. By following the tips and techniques outlined in this guide, you can create high-quality product images that drive sales and customer engagement.
Invest in product photography and create a competitive edge in the ecommerce market with Orbitvu. Book a demo with us, and level up your content creation today!
This blog post was originally published in January 2021 and was recently updated for comprehensiveness.
Talk to Orbitvu about your workflow
Use the form to tell us what you are planning and what kind of product content workflow you need.
Use this practical buyer's guide to evaluate automated product photography systems, avoid costly procurement mistakes, and choose a workflow that scales with your catalog.
Discover how automated product photography can elevate your e-commerce store. Learn key techniques for success and enhance your online presence. Read more!