90% of Etsy’s users confirmed that the quality of product photos was „extremely important” to their purchase decision, prevailing over other factors such as the item’s price or shipping cost. Great e-commerce photography can indeed skyrocket your conversion rates!
Here is our complete guide on e-commerce product photography! Learn how to create stunning imagery, showcase your products, and boost online sales with our tips!
Why is product photography essential for selling online?
To answer this question, let’s start tracking your potential customer's journey. Visual content grasps the user’s attention and sparks initial interest. Traditional brick-and-mortar stores benefit from natural advantages such as good localization, visibility of the front store, and merchandising. Also, in traditional retail, the customers are directly greeted by sales assistants trained to advise them.
How does it translate into online stores? Think of your website as a front store. „Don’t judge the book by its cover”? Well, we all do. The product images featured on the main page or in adsshould spike interest and encourage the user to click on them. The product page should provide them with a comprehensive description (this is the place to sell and persuade)and additional photos.These complementary shots showcase the item in detail — offering close-ups,presentingthe texture, and showing the use of the product in context. Most online stores today also provide a 360 view, which is a great solution to compensate for the lack of physical experience of the product before the purchase. The role of these visuals is to convince the customer to add the item to their cart.
The quality of your e-commerce product photography makes the difference between showing and selling. In fact, 93% of consumers said that images were essential in their purchasing decisions. Online shoppers do not have the opportunity to touch, handle, or test the item, and a great product photo should make up for that. Make sure your images represent the product in a flattering yet realistic way. Keep in mind that unrealistic images result in a higher number of returns, leading to additional costs and customer deception.
Beyond showing and selling the product, e-commerce photography buildscustomer trustand thebrand's visual identity.Low-quality, or even worse, stock photos will have the user question your credibility. Investing in professional product photography shows that you take your business and its customers seriously.
Consistent visual content is crucial in establishing your brand’s visual identity. Ideally, the user should easily associate your contentseen in ads or on social media with the brand. Product photos should address your target audience and bring up shared values and aspirations, especially context or lookbook shots. Visual content shapes the customer’s perception of the product — think of luxury brand campaigns, for example. High-quality images are vital to long-term communication with buyers at any stage of the customer journey andimprove the overall brand experience at several touchpoints. This rule applies to all types of products.However, it is important to recognize that making great product photos can be particularly challenging for some industries for various reasons. For example, product photography for the furniture industry can be demanding because of the size and weight of the featured items. On the other side of the spectrum, jewellery photography requires shooting small objects at a close distance, which makes producing a sharp and clear image difficult. As you can see, each type of product photography brings its own challenges.
The five stages of customer journey
If the arguments mentioned above are not enough to convince you, here is the final one! From all the digital marketing expenses you could make,well-executed, high-quality e-commerce product photography greatly impacts conversion rates. And that is what makes it a great investment!
Types of product photography
There are several types of product photography. How do you know which is most suitable for your online store? It depends mostly on the kind of products you sell and the purpose of your product images. Are they to be used only on the website? Do you also use platforms such as Amazon or Etsy? Do you need to create images for marketing campaigns, social media, and digital ads? Are you consideringprints such as thank you cards, posters, a hard copy catalog, or a lookbook?All these questions are valid and should be answered before you start planning the photoshoot! Identifying your goals will save you much time later and is fundamental to optimizing your efforts.
Furthermore, yourbrand book should detail the type and style of e-commerce product photography and other visual content. Remember that your e-commerce store's product photos should be aesthetically and functionally consistentand easy to reproduce as your offer expands.
In e-commerce product photography, the images can be:
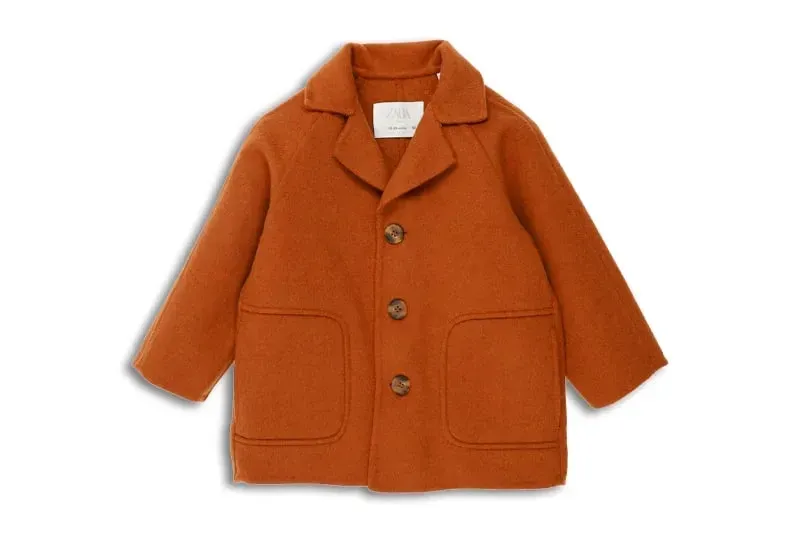
- Product-centered— packshots, flat lays, or photos with a ghost mannequin on a white background (or any other solid color).
An example of a packshot, flat lay and ghost mannequin photography
- Still life or lifestyle — flat lays with props, lookbook shots, and life-model studio photos.
An example of a creative flat lay photoshoot
The choice will depend on thenature of your product. However, combining product-only detailed photos and context shotsis usually recommended to help potential customers visualize the item before making a purchase.
What is your strategy for e-commerce photography?
Once you’ve decided on the type of photography, it is time to plan your shootmeticulously. As previously highlighted, your product images must embody your brand’s visual identity, maintaining a consistent and cohesive aesthetic for all your products. A disorganized or inconsistent display on your product pages can be off-putting and may deter potential customers.
In the planning phase, keep yourbuyer persona in mind, tailoring the imagery to what resonates and appeals to them. E-commerce product photography should strike the perfect balance between being informative and visually engaging. Additionally, your product images need to be easily replicable. We recommend selecting a standardized sequence of shotsand applying this consistently across all your products. This approach ensures you showcase multiple perspectivesof each product, providing a comprehensive view that informs and entices your customers. At this stage, also think through the composition of your product images, considering how each element, from background to lighting, will contribute to the overall impact and message of the photo. With careful planning and a strategic approach, your product photography can significantly enhance the appeal and effectiveness of your e-commerce platform.
Create a storyboard— sketch and describe the shots you want to take during the photoshoot. This visual tool will help you optimize your workflow and communicate with your creative team. A storyboard or a hard copy lookbook page can also be useful to visualize the layout of your e-commerce store.
Preparing for the photoshoot
Before starting, consider hiring a professional photographer. While this option may appear pricey upfront, it’s an investment that can save you considerable time and effort in the long run. A seasoned photographer with experience in commercial shoots will know how to achieve the results you wish for. Moreover, remember that post-production and mastering professional editing software have a steep learning curve. Opting for a professional ensures top-notch imagery and significantly streamlines your content production process, allowing you to focus on other critical aspects of your business!
Set up your photo studio!
What are the absolute must-haves for your studio?
- A camera;
- Lenses adapted to the types of photos you intend to take;
- Tripod, to ensure stability and shots repeatability;
- Lights, reflectors, and softboxes;
- White background;
- A table/flat surface for flat lays;
- A remote trigger;
- Photo editing software;
- Props if you are using any.
Choosing the right camera for product photography
This part will concern you less if you are hiring a professional photographer. Professional cameras and product photography equipment can be pricey. If you are just getting into the field, consider renting to test different digital cameras and see which suits you best. The choice of equipment is not only about the technical features — ergonomy is another factor worth considering.
Check the accessible range of camera settings and how much freedom they offer. Packshots will be mainly shot in a fully manual mode, so knowing how much flexibility your equipment offers is important.
What about the color rendering? No camera will see the color exactly like the human eye, making post-production important. Remember that the correct white balance setting hugely impacts the result.
Image quality is strictly linked to the resolution. The bigger the image (billboards, posters, etc.), the higher the resolution needed.However, for packshots, the standard range should be satisfying.
What camera works best for e-commerce product photography? It depends on your personal needs and the use you will get out of it. Both mirrorless and DSLRs have pros and cons, and we have written a whole article to help you make an informed decision.
Lens
When it comes to the lens, choose one that is:
- Sharp in the range of F8-F11. High-end lenses guarantee better sharpness and are worth the splurge!
- Right focal length for your subject. Macro lenses allow for shortening the closest focusing distance
Lighting for e-commerce photography — natural window light or artificial lights?
Lighting can truly make or break a photo. For still-life shots for your social media feed, try shooting next to a window to benefit from natural lighting with a soft shadow. Avoid direct sunlight that can be too harsh — it can be diffused using a white cover such as a sheet of paper or a curtain. Your product needs to be uniformly lit from both sides.Therefore, install a reflector on the opposite side of the window to bounce the light back onto the photographed item.
However, for professional e-commerce photography, go withstudio lights. Consistency in showing colors and repeatability of shots are essential for good product images and can be achieved in a professional studio setting. When working with artificial lighting, use several light sources to illuminate the product evenly. Start with a key light— the main light source in front of the product, such as a light ring. Complete your setup withlow-intensity secondary side lightsand abacklight for better definition. Remember also to light the background and not only the photographed object.
Continuous light or flash — which is better? Well, it depends. Continuous light is softer and easier to manipulate. It also allows you to preview the results live. Strobes, however, require synchronization with the camera (cable or remote) and the test takes. The synchronization time is usually a 1/200 second, so the shutter speed should not be quicker.
Flashlightsare preferable for shooting freehand or capturing a frozen frame of an object in movement. Although it works great for lookbook shoots, it will not be the best choice for highly repetitive packshots for your product pages.
For packshot photography, choose artificial light adjusted to aneutral color temperature and use photographic diffusers or softboxes. Diffusing the light will enable you to soften the shadows and save time in post-production.
Automated Solutions
When it comes to product photography, some industries are particularly demanding. Let’s take the furniture industry as an example. Due to thesize and weight of the products, taking consistent and repeatable shots can be quite challenging. Many freelance photographers lack experience and understanding of furniture product photography.
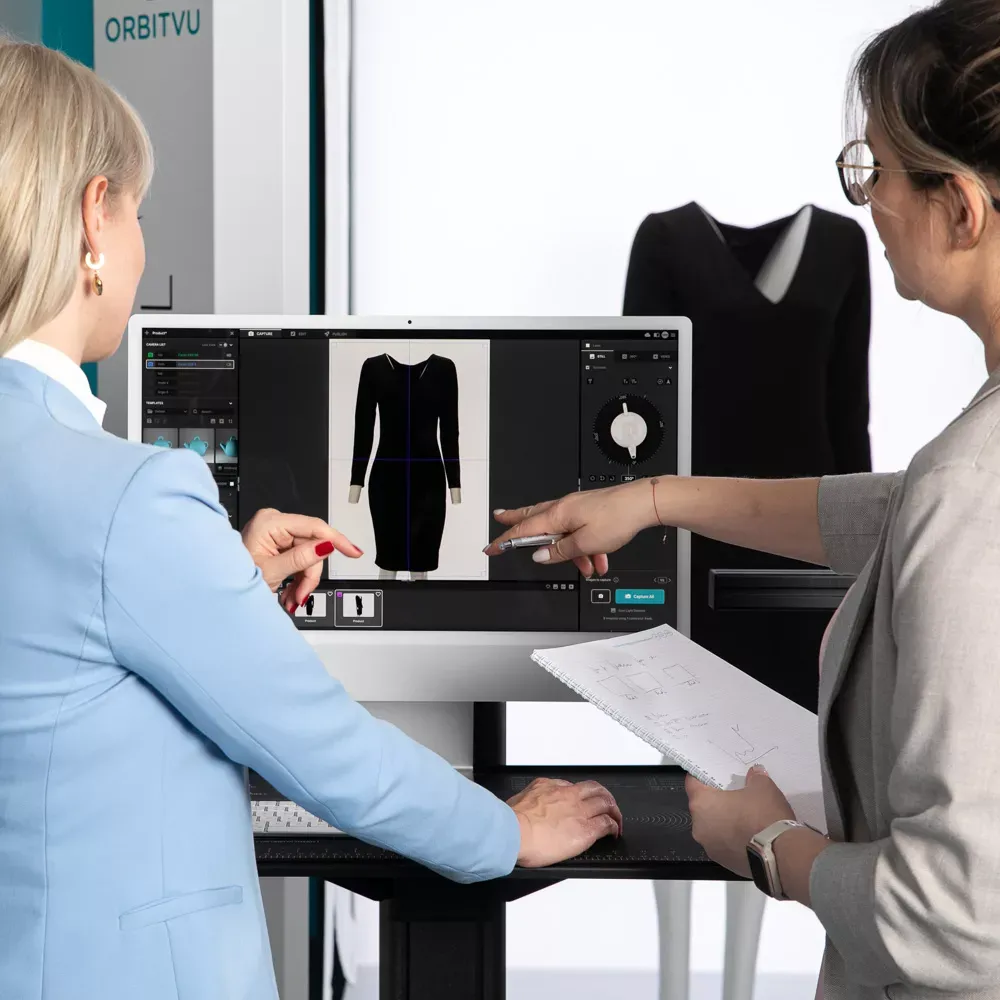
A well-thought-through and organized studio with a streamlined workflow for regular shots will remarkably smoothen the process. Yet, manually building and equipping a studio adapted for shooting such big products can be daunting! Opting for an automated studio, such as our E-comm Studio +, can save you money and time on logistics while keeping content production in-house.This solution is fully customizable and provides all the necessary equipment to shoot, edit, and publish, helping you take many professional product photos for your e-commerce business in a short time.
Furthermore, thanks to the integrated software, you can save personal templates to facilitate repeatable shots. Orbitvu Station makes your computer the control hub, allowing you to conveniently adjust your camera and light settings or preprogram turntable angles. The content can be published directly on your website or e-commerce platform or exported. The studios can be easily operated by non-professionals after minimal training thanks to our revolutionary software, which works for you, not the other way around. How come? Customize lighting, camera settings, and preferred image style until you get your perfect shot! Then, simply save its settings in a template file and repeat for similar products. Once your shots are ready, you can automatically remove the background and batch post-process, enabling automatic cropping, scaling, alignment, anduploading to the web or saving.We provide integrations with the most common e-commerce platforms(Magento, Shopify, PrestaShop, WooCommerce) and workflow management tools (Creative Force, Shotflow).
For shooting smaller objects, you do not need a studio that big.There are other automated solutions available to suit your needs. For example, for shooting flat lays, opt for Alphadesk or Alphatable, our dedicated solutions for automating this type of product photography. The camera can be installed on a special mount, and the table features lateral lights with adjustable intensity and range. Once again, the hardware integrates our powerful software with all the features mentioned above!
Prepare the main character of your product photos
This step can save you loads of time and a headache in post-production!
- Iron or steam the textiles.
- Check in for any loose threads or forgotten labels.
- Make sure there are no stains.
- Dust and polish reflective surfaces.
- Make sure the items are assembled correctly.
Correcting the above before shooting is much quicker than editing the product image.
Right camera settings for product photography
Getting started, especially in manual mode, requires some practice. As you gain experience, seeing nuances and adjusting settings will be easier. Here are some facts you need to know!
Shutter speed
Shutter speed should always be considered on par with the aperture, as both are complementary andregulate the light flow to the camera sensor. The value indicates how long the shutter, a curtain-like part between the lens and the camera body, remains open, allowing the light to go through. It is measured in fractions of a second andvaries from 1/8000s up to 30s.
How does it impact the image? It is a key factor in adjusting the brightness. It is strictly linked to aperture and ISO — assuming both are fixed, the higher the shutter speed, the darker the photo will be.
To shoot with a lower value, which translates into a longer exposure time, use a tripod to avoid blurriness. On the other hand, the shorter exposure time will work great for capturing objects in movement.
Aperture for the product image
The aperture is the opening in the lens that regulates how much light gets through the image sensor. The value reflects the ratio between the opening vs. the lens surface. The parameter can go from f/29 (small hole) to f/1.8 (big hole). Lower f-stop parameters result in a lighter picture, while a higher number will make it darker.
In addition to brightness, the aperture can also affect the depth of fieldof your image. What does it mean? How deep into the imagined photo space should the item stay in focus? Furthermore, the aperture impacts the quality of the image. As the f-stop parameter goes up, the depth of field of your image should increase.
ISO for product photography
ISO defines the sensitivity of the light sensor.It is measured in a range from 64 to tens of thousands. It should be kept as low as possible, given lighting conditions. A higher ISO will increase thenoise in the photo. Using low ISO is not only a matter of aesthetics but also quality.
Thanks to Orbitvu Station, adjusting the abovementioned manual parameters is effortless! To set a parameter value, simply move the right sliders. Exposure simulation lets you see a preview directly on your computer screen via Live View.
White Balance
White balance plays a considerable role in rendering colors. But what is it? Well, it is an adjustment of the intensity of primary colors. When set properly, white objects appear white in your photos. However, adjusting this parameter can help you achieve cooler or warmer tones.
Remember that the warmer look triggers a sense of coziness in customers, which can positively impact their purchase decision! Colder tones work great for medical products, as they are often associated with the sterile hospital or lab environment.
Resolution in product photography
How high should it be? High resolution is important for big formats and prints.For product images on your website, stay within the standard range. The resolution should be high enough to ensure the photo’s great quality and low sufficient for loading correctly. If the resolution of your photos needs adjusting, automation can significantly smoothen the process. Thanks to Orbitvu Station, you can batch-process and resize selected files to a format of your choice by simply pressing one button!
What next?
Post-production in e-commerce photography
This step should not be underestimated. The final image of your product should go through adjustments and retouches. How to edit pictures? You can find extensive articles on our blog. Here is what you need to know to get started!
Hiring a professional could be worth a splurge if you have little experience with photo editing. It will save you the hassle and the license fees for software such as Adobe Photoshop. You can try free image editing tools if your photos only need a little work.
Brightness and contrast
This parameter can make your images pop and highlight the important parts of your product photo. However, more is needed to make your picture look washed out. Contrast, on the other hand, impacts the saturation.
Mind the background!
The white background remains the safest and most popular choice for product-only images. However, if you feel like going fora solid pop of color — why not! In that case, the only thing to remember is the layout of your online store or Instagram grid. Once published in the template, the product photos should remain consistent and coherent.
Keep in mind that with the help of automatic background removers, you can easily cut out the photographed item and place it on a plain white background if any mishaps happen during the shot!
If you are shooting still-life or lifestyle shots, mind the composition! The background should not be overly crowded, and the props should provide complementary information and not overpower the advertised product!
Sharpness
Sharpness correction involvesenhancing the clarity and crispness of details within a photograph. This adjustment can help you highlight details and textures, improve the focus, and realistically represent the photographed item. What about the shadows?
Whether you choose artificial or natural light, a shadow follows where there is light. However, it is not necessarily a bad thing. Soft shadows add depth and realness to your product photo. So, the goal is to create and manipulate the light in the shadows to your advantage.
The shadows are defined by two main criteria — location and quality.
The locationdepends on the position of the photographed item and the light sources. You do not want the shadow to obscure other props or overpower the picture.
The qualityof the shadow, which is how crisp and sharp it is, can be manipulated with light size and distance. Aim for softer shadows, naturally blending into the background without becoming the image's main focus. If you shoot in natural light, shoot close to the window while facing it to limit the shadows. Use a diffuser, a translucent curtain, and a bouncer to manipulate the effects.
SEO for e-commerce photography
Optimize images
Did you know that pictures influence your SEO results? Excellent commercial product photography is not only about its visual aspects but also how it affects your website’s ranking. Search engines increasingly focus on images in their algorithms.
High-quality images optimized for SEO can generate additional traffic to your online store.
Google Images is sometimes the first place your customers browse through when doing shopping
File Size
Large images take longer to load, which impacts your website’s performance.To know where you are, use Google Console to analyze the Core Web Vitals of your store and make the necessary adjustments.
Remember that different e-commerce platforms have their requirements, but aim for your pictures to be between 100 and 200kb.
For e-commerce product photos, choose between JPG, PNG, or WebP. JPG allows for a lot of detail and multiple colors. PNG works great for transparent backgrounds. WebP will enable you to reduce the size of your files, even by 30%, significantly improving your website loading time. Avoid using GIFs, as they are quite heavy. Most image editing software enables you to convert your file to any of these formats.
File name
It should be descriptive and include your keywords separated with hyphens!
Alt Text
Also calledAlt tags,the term describes additional text data meant to represent the image, convey its message, and translate it to the search engine. To boost your ranking, do not leave it empty!However, remember that it is not a space to list all your keywords. Write a clear and concise explanation of what can be seen in the picture for visually impaired viewers.
Final Thoughts
As you can see, e-commerce product photography plays atremendous role in online selling.High-quality product photos should capture attention and spark potential customers' visual interest. A product image should be informative and convincing enough to sell the item.
E-commerce product photos are also crucial to your brand’s visual identity; therefore, they should be coherent andconsistent with your communication style.
If you want to learn more about camera settings for product images, how to photograph clothing, jewelry, or furniture, or other automated product photography tips, visit our blog!
Talk to Orbitvu about your workflow
Use the form to tell us what you are planning and what kind of product content workflow you need.